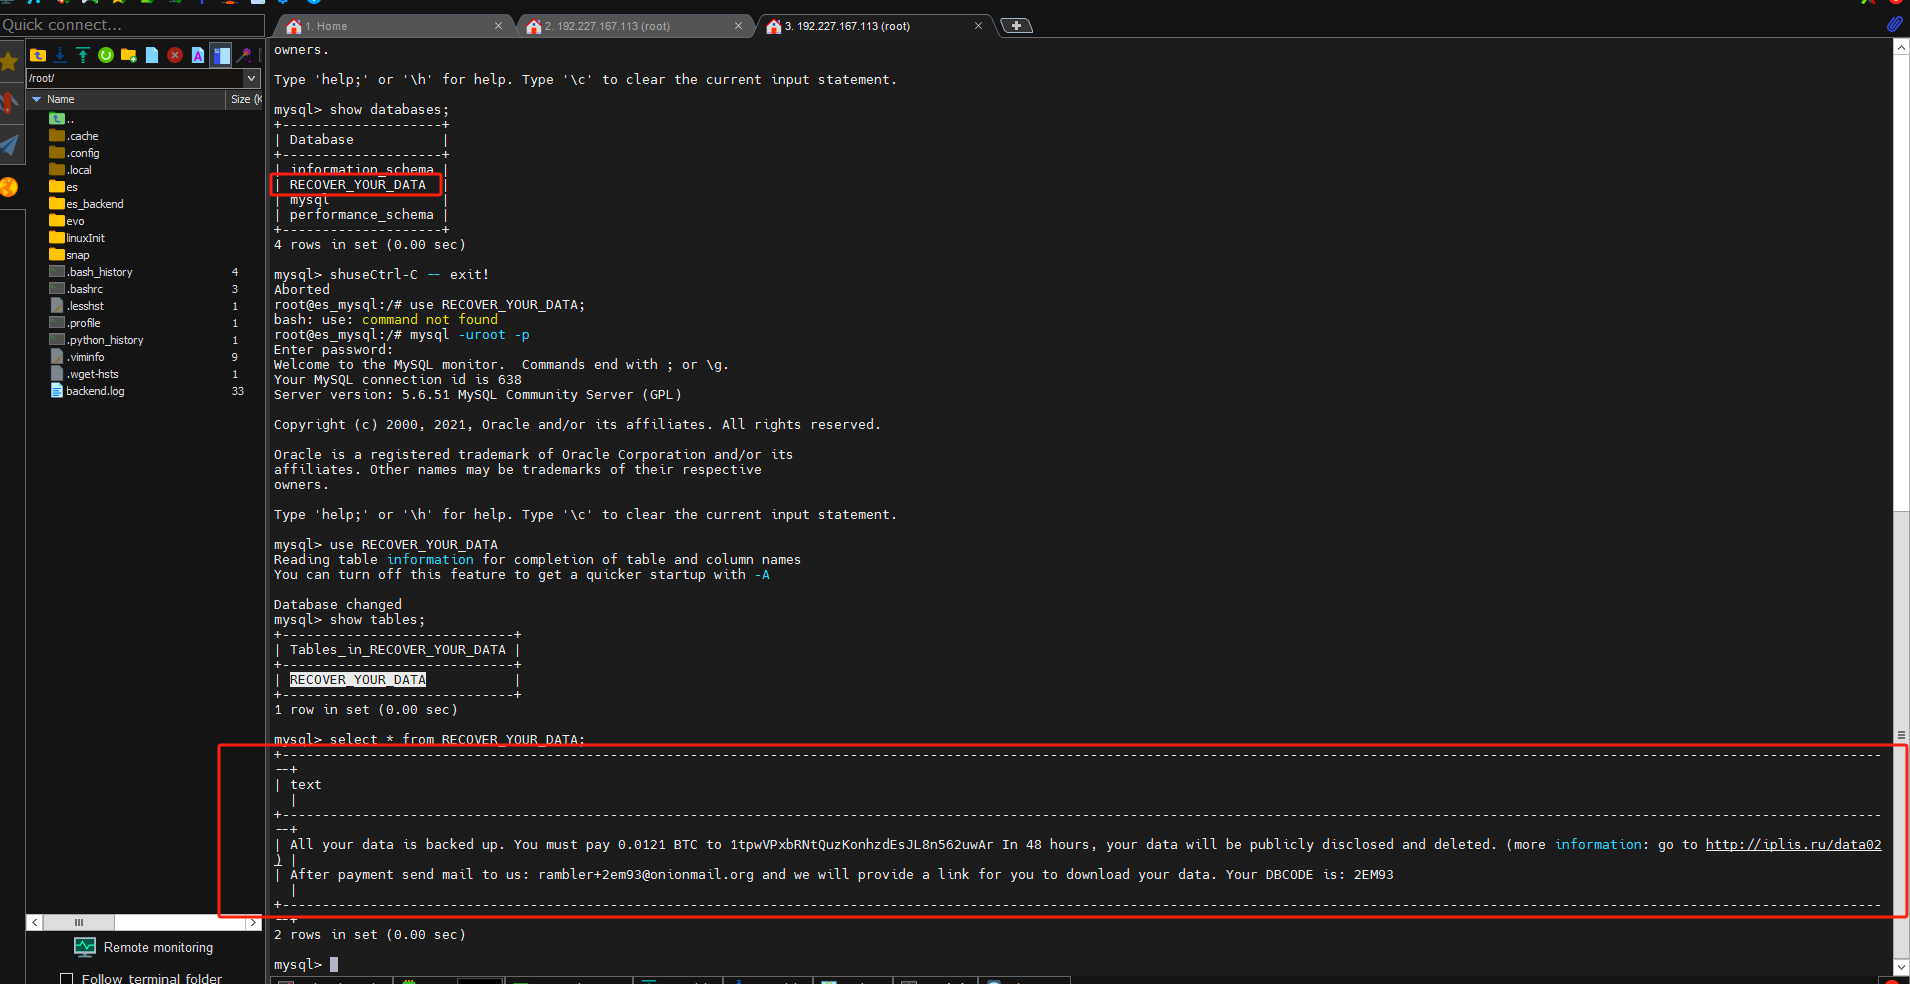
2024年4月8日,我和其他前端同事合作开发的考试系统,mysql数据库被黑,宕机。
随后我禁止公网暴露mysql数据库,开始研究对其他网络协议的防止暴力破解,于是使用fail2ban对sshd和http的爆破进行限制。
fail2ban:禁止爆破
参考链接:https://www.myfreax.cominstall-configure-fail2ban-on-ubuntu-20-04/
fail2ban是根据你配置好的日志文件,和jail服务,来临时ban ip的,如果需要永久拒绝某个ip,直接操作防火墙ufw更合适。fail2ban只能根据配置好的jail_name来临时ban ip.
直接日志位置: /var/log/fail2ban.log
apt update && apt install fail2ban
在默认情况下是禁用的,因为它的一些默认设置可能会导致不良效果。
systemctl status fail2ban
fail2ban.service - Fail2Ban Service
    Loaded: loaded (/lib/systemd/system/fail2ban.service; disabled; vendor preset: enabled)
    Active: inactive (dead)
    Docs: man:fail2ban(1)
配置目录:/etc/fail2ban
默认有jail.conf的配置文件,但是不要动conf,自己新建.local的配置文件在local中编辑:
cp /etc/fail2ban/jail.{conf,local}
jail.local中有三个重要的
bantime  = 1d
findtime  = 10m
maxretry = 5
Fail2ban附带许多Jail作为示例,系统每一项服务都可以找到对应Jail配置。 要启用Jail,您需要在添加enabled = true。 以下示例显示了如何为sshd服务启用Jail:
[sshd]
enabled   = true(ubunt可以不写)
port    = ssh
logpath = %(sshd_log)s
backend = %(sshd_backend)s
/etc/fail2ban/jail.local
每次修改配置文件时,都必须重新启动Fail2ban服务,以使更改生效:
sudo systemctl restart fail2ban
fail2ban-client
检查fail2ban监视的sshd:
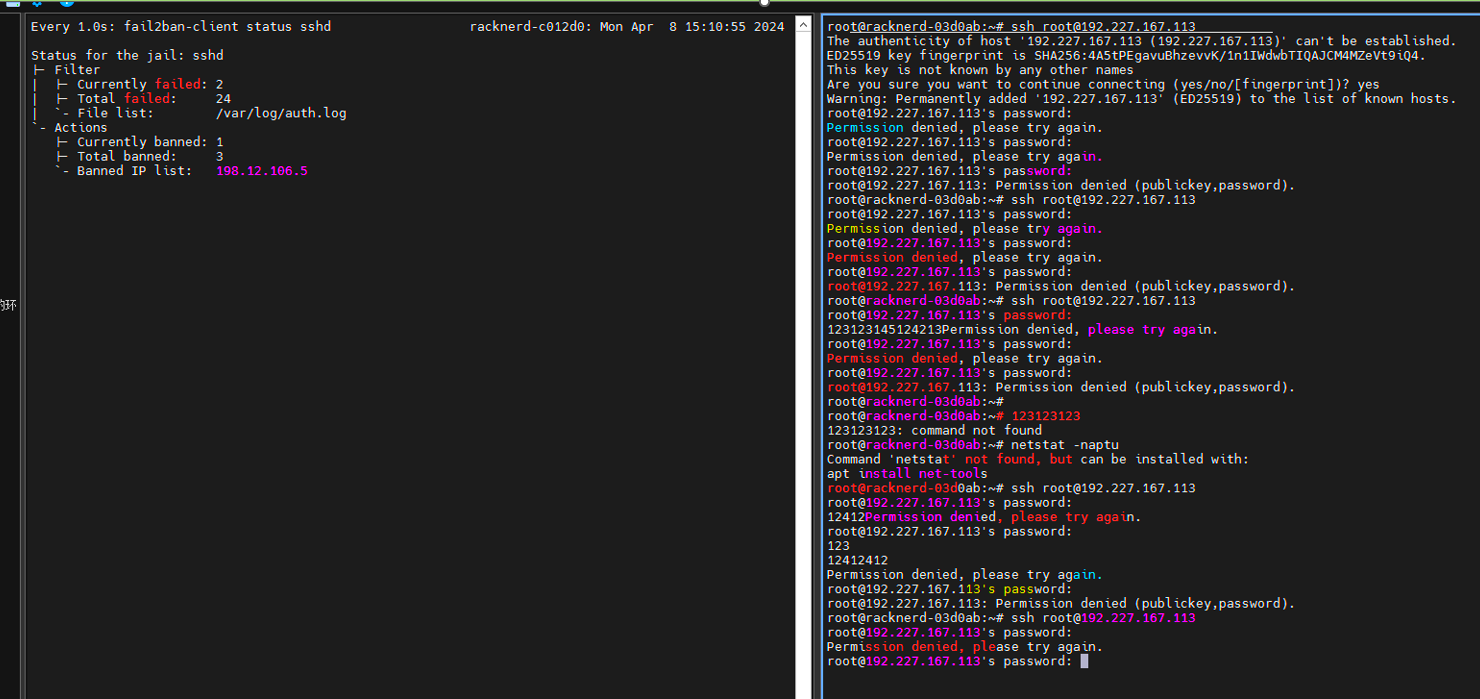
fail2ban-client status sshd
unban ip:
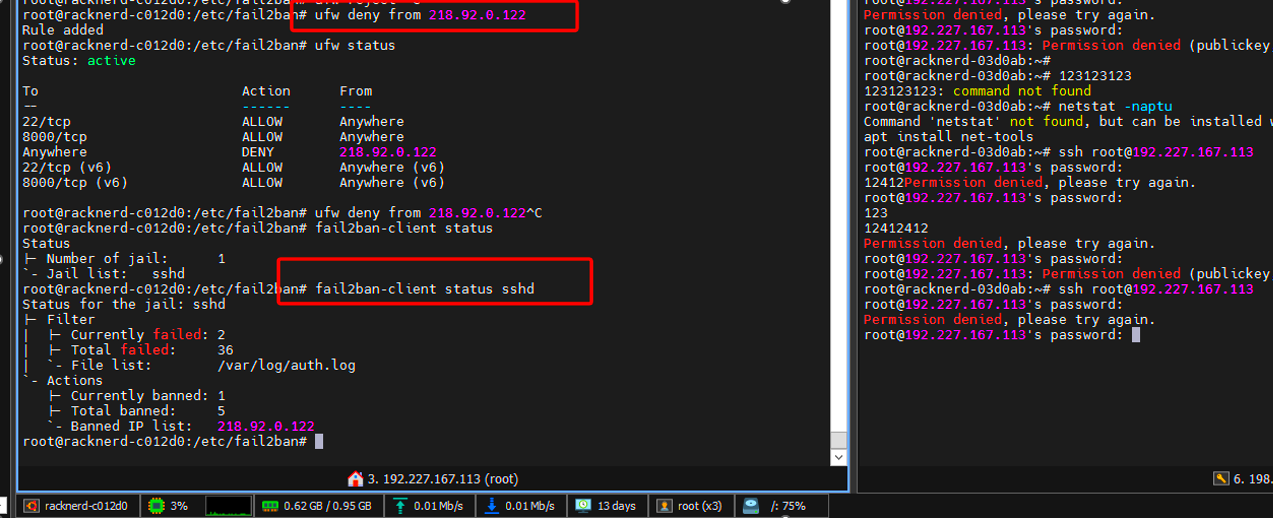
fail2ban-client set sshd unbanip 23.34.45.56
banIP:
fail2ban-client set sshd banip 23.34.45.56
我自己爆破sshd测试了下,这里一次ssh有3次重试密码机会,然后jail写的5次,这里其实测试的时候输错了15次密码,才会被fail2ban认为是要ban的ip。
实战:自定义WEB系统django封禁404或者爆破问题
我是用uwsgi启用的django,日志文件与格式如下:
/var/log/uwsgi/uwsgi.log
[pid: 799467|app: 0|req: 36/44] 129.151.212.54 () {40 vars in 544 bytes} [Tue Apr  9 07:44:07 2024] POST /api/login/ => generated 41 bytes in 244 msecs (HTTP/1.1 304) 7 headers in 267 bytes (1 switches on core 0)
[pid: 799467|app: 0|req: 37/45] 129.151.212.54 () {40 vars in 543 bytes} [Tue Apr  9 07:44:10 2024] POST /api/login/ => generated 41 bytes in 263 msecs (HTTP/1.1 304) 7 headers in 267 bytes (1 switches on core 0)
可以看到登录接口响应304,
然后,网络做法通常为使用 正则表达式 测试看是否能匹配到日志中测试数据:
但是此处有坑点,日志中有非标准格式行,会直接报错IndexError: string index out of range。这个问题仅仅是fail2ban-regex本身这种小测试工具的问题。
fail2ban-regex /var/log/uwsgi/uwsgi.log "<HOST> \(.*\) .* \(HTTP/[012.]+ [345][0-9][0-9]\)"
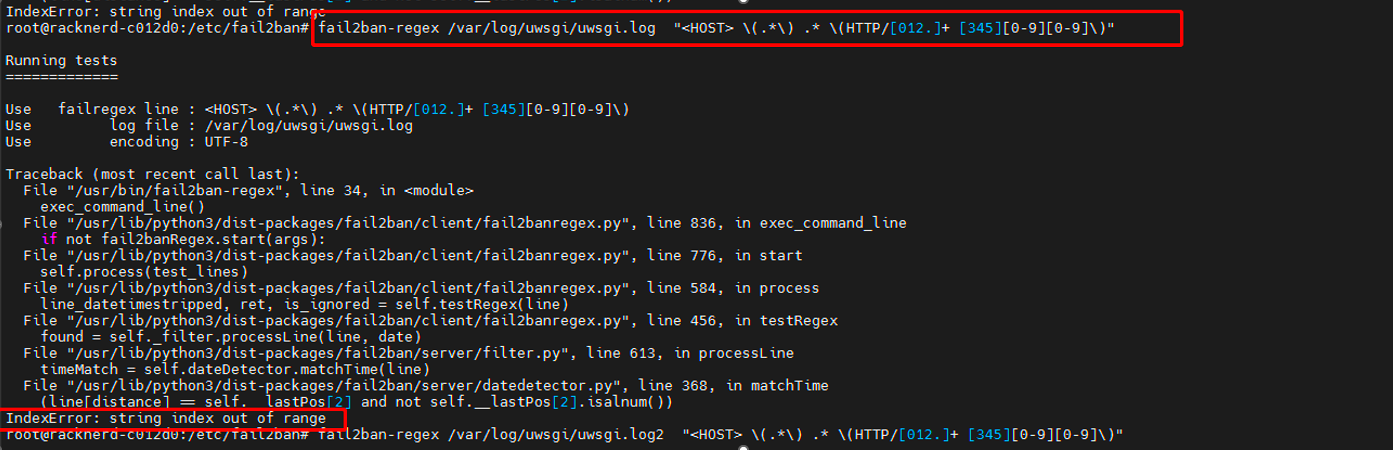
此时为了测试,需要把测试数据完整行单独放如/var/log/uwsgi/uwsgi.log2 的文件中测试正则。
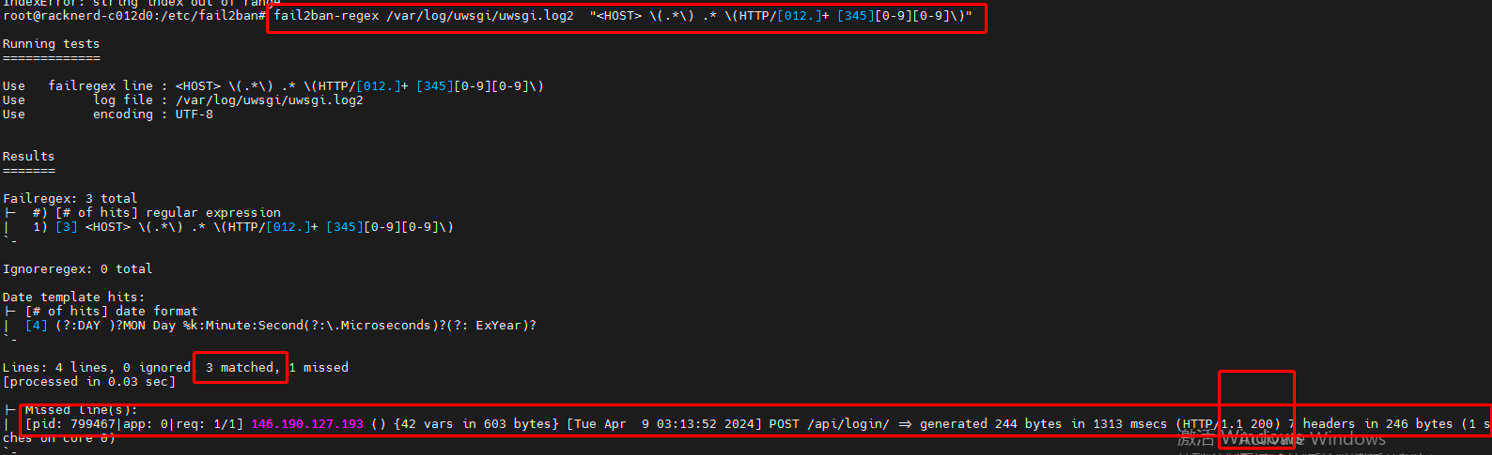
说明测试通过。
新建jail,自行命名
vim /etc/fail2ban/jail.d/jail_uwsgi.local
[uwsgi]
enabled = true
port = 8000
protocol = tcp
filter = uwsgi
logpath = /var/log/uwsgi/uwsgi.log
bantime = 120m
findtime = 10m
maxretry = 15
新建filter,自行命名
vim /etc/fail2ban/filter.d/uwsgi.conf
[Definition]
failregex = <HOST> \(.*\) .* \(HTTP/[012.]+ [345][0-9][0-9]\)
ignoreregex =
/etc/fail2ban/jail.local (不要编辑jail.conf)
一众配置中新增如下:
[uwsgi]
# 此处jail.d定义和本初jail.local的参数可互相迭代指定,此处可仅写个[uwsgi]而不写配置参数(因为我的方法,在jail中已写)
重启fail2ban
systemctl restart fail2ban
自己在本地打15个304的HTTP请求包后,可以看到自己的IP在 uwsgi 的jail 中被ban:
root@racknerd-c012d0:/etc/fail2ban/jail.d# fail2ban-client status uwsgi
Status for the jail: uwsgi
|- Filter
|  |- Currently failed: 0
|  |- Total failed:     15
|  `- File list:        /var/log/uwsgi/uwsgi.log
`- Actions
|- Currently banned: 1
|- Total banned:     1
`- Banned IP list:   129.151.212.54
root@racknerd-c012d0:/etc/fail2ban/jail.d# fail2ban-client status sshd
Status for the jail: sshd
|- Filter
|  |- Currently failed: 2
|  |- Total failed:     6
|  `- File list:        /var/log/auth.log
`- Actions
|- Currently banned: 3
|- Total banned:     3
`- Banned IP list:   218.92.0.122 218.92.0.22 218.92.0.29
postman此时由于触发ban,发送仅响应503 service unresposable, 触发ufw的reject行为
Welcome to point out the mistakes and faults!